Hidden Ruins Chapter 3 Walkthrough – Help Professor and team up with Rachel, Tawa, and Peter to stop Larissa before she takes the treasures of the Kumari civilization for herself and see if you can survive the Hidden Ruins!

Adventure Escape: Hidden Ruins – Mystery Story Room Escape game by Haiku Games
Adventure Escape Hidden Ruins Chapter 3 Solution
find 4 fragments and go inside left cave to pick up more 4 fragments
go out to right cave and take another 4 fragments + hawk jar
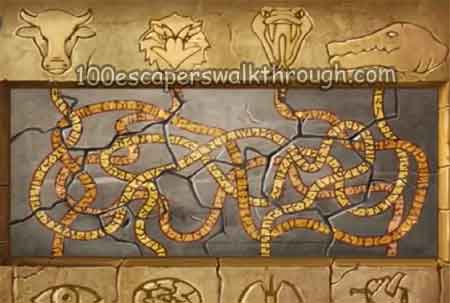
go back and tap on the ground, then place all the fragments on it and connect them together like this :
go down the stairs, pick up the gear and go to the right
pick up the sieve and snake jar
go out and use the sieve to get the key from the fountain
go to the left door
after the lights on, tap 12 things that different from the photo
use key to open the chest for rope
pick up crocodile jar, brush and cobweb
go back up and use brush to the sand on floor to get gear on each room
go down after you have total 3 gears and put them to the box on the right room

solve the gear puzzle
connect the rope to the bird cage by the lever
use cobweb to the bird and take the bert
use it to reach the star on top left
go out and place the star to the stone chest, obtain the ox jar inside
back to right room and place the jars to the jar puzzle
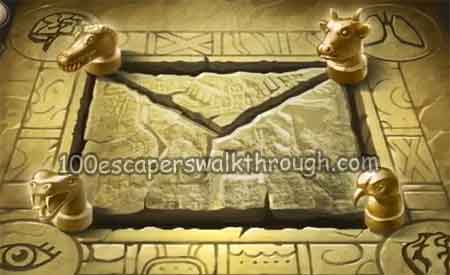
move them to get the final placement like this
the secret door will open and you can move to next level
pick up plank, checkered piece and sword
use sword to cut the vine on door and another one on floor
use bert to reach the checkered piece on top right and plank on left tree
move right stone to get another checkered piece
go to the left and pick up another plank + checkered piece
use sword to cut left vine and get the checkered piece
cut the vines on middle with sword and put all checkered pieces
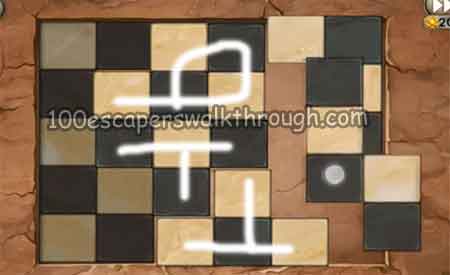
connect them together to solve the puzzle
now tap the blue color like the one on the pool :
x o o o x o
o o x o o o
o x o o o x
x o o x o x
o o x o x o
go through the door
connect all 5 planks + vines to complete the bridge
look at the symbols on the top stone tablets, back to the statue and use the symbols in the correct order to get the spear
use the spear to get the drone and computer chips
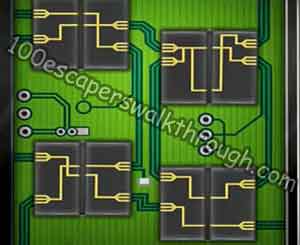
back to the first place and place the computer chips on the tablet :
use the drone to break the wall and finish
proceed to hidden ruins chapter 4 or see the complete Adventure Escape Hidden Ruins Walkthrough